I found this fabulous tutorial over on the Simple Stories blog and wanted to share it here with all of you.
An Envelope Tutorial
By Emily Pitts
Today I'm going to show you how to make your own envelopes for cards or hidden journaling on your layouts. Sure you can buy fancy envelopes, but do they match the Simple Stories lines? I don't think so. But now you'll know how to make your own, our sample is 3.5" x 6". You can make them smaller or a bit bigger using one 12" x 12" sheet. I'm using the new Year•o•graphy line for this tutorial.

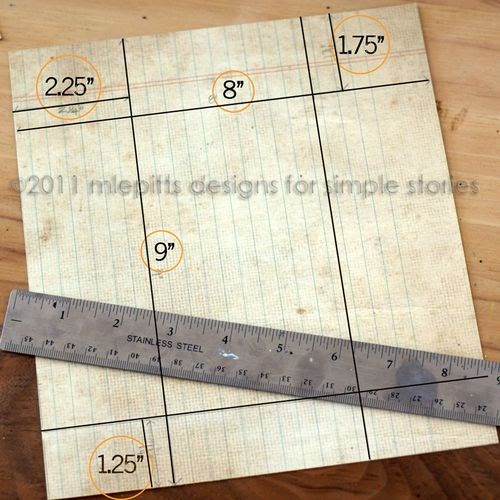
1. Cut an 8" x 9" rectangle and mark out the following measurements:
2. Cut out the corners:

3. Trim just a bit off the edges, note how the greyed rectangle in the above image is just a bit larger on the edge? Trim the one edge a bit more, as shown below, this will make the folding much easier.

4. Score and fold.

5. Fold the two sides in, draw a slight curve on the top side of the envelope and cut it out.

6. Do the same for the top and bottom flaps. You can use a corner rounder for this step as well.

7. Glue the center and bottom flap.

8. Let dry.

9. Punch 2 circles, I used a 3/4" punch. Add a brad to the center of each circle, apply a pop dot to the back of each circle.

10. Attach the circles to the flap and the back of the envelope. Wrap with a bit of twine to hold it closed.

11. Decorate as desired, and you are finished. Now you have a custom made envelope to match the line you are working with. Pretty cool, huh?

Supplies:
Year•o•graphy Fundamental Cardstock Stickers
Year•o•graphy Expression Cardstock Stickers
Year•o•graphy Green/Notebook
Year•o•graphy Red/Mini Calendar
OTHER: The Twinery twine in Cappuccino, Brads, Scotch Quick Dry Liquid Adhesive
No comments:
Post a Comment