This week's inspiration is brought to you by Jenn.
I'm the tutorial assignment this week! To me, simple things you can do to add character, beauty and make your page look wonderful!
This tutorial includes 3 ways to make very simple flowers out of paper. If you want your flowers to absolutely match the project you're working on, this works perfect!
They are all EASY PEASY!
Flower #1
You will need a circle punch, size depends on what size flower you want. I typically use 1 inch. Adhesive, any kind but glue dots or wet work best. Something for the centre of the flower which can be a button, bling or other small circular object you want to use.
Step 1 - Punch 8 circles out of the paper you want to use. You can use cardstock or patterned paper, but double sided patterned paper gives the best effect.
Step 2 - Fold all circles about 1/4 to 1/3 in from the edge as shown below.
Step 3 - Adhere first two circles to your project with folded sides joining as shown below.
Step 4 - Adhere next set of circles the same way, with folded parts joining, but the outside edge overlapping the previously laid circles. Continues to do this all around to form a flower circle. Then pop your centre in the middle for the finishing touch! See below.
Flower #2
This flower is done with the same tools and paper as above. Paper, a circle punch and a finishing touch for the centre. You will also need your scissors. I also find double sized patterned looks best, but plain or cardstock will also work.
Step #1 - Punch out 4 circles with the circle punch. Again, size depends on how big you want the flower, but I typically use 1 inch punch.
Step #2 - cut each circle in half
Step 3 - Adhere 4 circles to the project with flat ends running the same way and tips touching. If using double sided patterned paper, use all 4 in same colour first.
Step #4 - Once first four are in place, adhere the next 4 in the blank spaces in the same way. Flat edges all the same way and tips touching in the centre. If using patterned paper, use the opposite coloured side.
Step #5 - Adhere your centre. You may want to use a jewel, a button or some other material for a perfect centre.
Flower #3
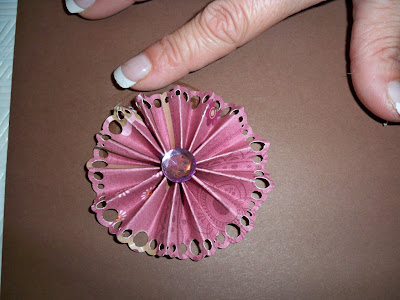
Materials needed are a border punch, strip of paper. Patterned or cardstock will work. Adhesive, wet works best. And a little special something for the centre.
Step #1 - Punch your strip of paper with the border punch you are using all the way across.
Step #2 -Fold the strip of paper acordian style a little less than 1 cm each fold all along the strip of punched paper.
Step #3 - Pull the folded paper together in a circle like a flower.
Step #4 - Adhere the circle together with the end edges of the punched paper. Glue dots work best as it takes a while for the wet adhesive to dry and tape runners just don't seem to hold as good.
Step #5 - Adhere the joined circle to your project in the pace you want it to be.
Step #6 - Adhere your centre to the flower for the finishing touch! You can use a button, gem or jewel or whatever tickles your fancy!
And there you go!! 3 easy peasy homemade flowers! They take very little time to do and the great part is, you can use paper that co-ordinates with your project!


1 comment:
Great tutorial Jen!!! Love the accordian flower!
Post a Comment